Showing posts with label Oracle. Show all posts

Wednesday, 2 August 2017

Broadcasting Chatserver Project java ~ gniithelp

Broadcasting Chatserver Project


Objective/ Vision

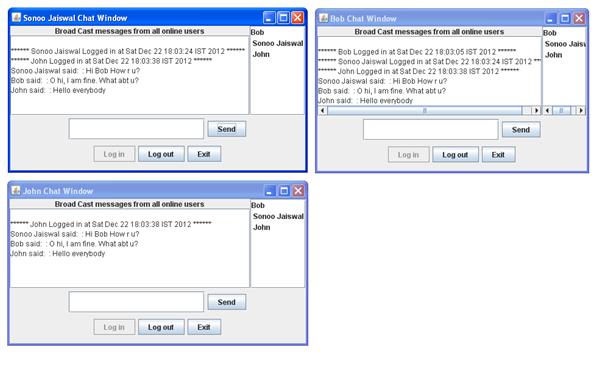
Users can interact to each other. They can share information to all others.

Software Requirement to run this project

  1. JRE

Hot to run this project

Run the server first, write: java MyServer
Now click on the executable jar file MyClient as many as you want. It will open different dialog boxes. Now try to communicate with each other.
click on the login button and enter your name, now you can share information.

Welcome Page


credit :- javatpoint
Read More »

Monday, 26 June 2017

SQL Tutorial Sample Database ~ GNIITHELP

  • Our Sample Database is a modernized version of Microsoft's Northwind.
  • The data model is kept simple and comes with only 5 tables.
  • You can play with a live database in our SQL Sandbox.
  • Or download our script and create your own sample database (model + data).


Sample Database ERD


ERD diagrams are an important tool for data professionals: they provide a wealth of information. 
This ERD displays tables, columns, data types, relationships, primary keys, foreign keys, and indexes.
Read More »

Friday, 23 June 2017

Error in handling images and css folder with jsp page in eclipse ~ GNIITHELP

If you are creating a dynamic web project and you are not able to use css folder files and image files in your jsp page then you need to read below code.

Project folder structure

Linking css file internally from folder to jsp page 

Linking image to jsp page from images folder

Read More »

Error! Problem in linking css file in jsp in Dynamic web Project with eclipse ~ GNIITHELP

When we have to link our css file that exists in css folder during dynamic web project in eclipse it shows problem regarding image loading or other linking problem.

Project Structure
If your project is in above structure then to solve out this problem you must specify your project name in link of css file like as below
Read More »

Android 5.0 Lollipop : Enable USB Debugging ~ GNIITHELP

To enable USB Debugging on Android 5.0 Lollipop

1. Settings > About Phone > Build number > Tap it few times to become developer 


2. Settings > Developer Options > USB Debugging.


To disable USB Debugging and other developer options when you don't need them, slide the switch at the top of the screen from On to Off.
Read More »

Enable USB Debugging Mode on Android ~ GNIITHELP

USB Debugging grants you a level of access to your device. This level of access is important when you need system-level clearance, such as when coding a new app.USB Debugging Mode is a mode that can be enabled in Android after connecting the device directly to a computer with a USB cable. The primary function of this mode is to facilitate a connection between an Android device and a computer with Android SDK (software development kit).

1. Android 2.0-2.3.x
Settings > Applications > Development > USB Debugging
2. Android 3.0- 4.1.x
Settings > Developer Options > USB Debugging
3. Android 4.2.x and higher.
  1. Go to "Settings".
  2. Scroll down to the bottom and tap "About phone" or "About tablet",
  3. Scroll down to the bottom of the "About phone" and locate the "Build Number" field.
  4. Tap the Build number field few times to enable Developer Options. Tap a few times and you'll see a countdown that reads "You are now 3 steps away from being a developer."
  5. When you are done, you'll see the message "You are now a developer!".
  6. Tap the Back button and you'll see the Developer options menu under System on your Settings screen.
  7. Go to Settings>Developer Options>USB Debugging. Tap the USB Debugging checkbox.
4. Android 5.0 Lollipop
  1. Settings > About Phone > Build number > Tap it few times to become developer
  2. Settings > Developer Options > USB Debugging
NOTE: To disable USB Debugging and other developer options when you don't need them, slide the switch at the top of the screen from On to Off.
Read More »

Wireless adapter NETGEAR wnda3100v2 work (ndiswrapper work) in Ubuntu / Linux operating system ~ GNIITHELP

(Tags: WNDA3100v2 not work / WNDA3100 work on the Ubuntu Linux / wireless adapter number WNDA3100 / wnda3100v2 / WNDA3100 / NETGEAR adapter WNDA3100 / NETGEAR adapter wnda3100v2 / NETGEAR wireless adapter / NETGEAR WNDA3100 drive / NETGEAR wnda3100v2 drive Linux operating system Ubuntu distribution / / WNDA3100 adapter)

that after my own struggle, I decided to be a great contribution to the Internet, because I see a lot of people have the same problem, different solutions available online, not everyone seems to understand. 

The key is installed, you need to let Windows create the necessary files, and then make them compatible with Linux, this is done by using the ndiswrapper. 

It was definitely written by Linux beginners, advanced so do not complain.

  1. Let your system. INF file (complete on Windows)
    • Since most Linux rookie like me from Windows, I assume you have installed the adapter on Windows systems. Navigate to your Program Files directory (on Windows), folder and file NETGEAR expected. All files Windows 2000 or XP folder copied there.
    • If you do not enter into the Windows system to extract the driver files, there is a way to do this using the "wine" directly in Ubuntu. Because it requires more processing on the Ubuntu system, because it is written in absolute beginner, I will not discuss this issue.
  2. Obtained ndiswrapper package file
    • These documents can be found here. You need all three.
  3. The files on your Ubuntu system
    • After your files, placing them on your Ubuntu system folder. Note that the driver will need to keep it permanently choose a place where you will not be deleted later.
  4. Installed ndiswrapper package
    • Open a terminal window. There are several ways to do this. The easiest way is to press Ctrl + Alt + T. More ways to look at this.
    • Navigate to your ndiswrapper file found in the directory using the "CD" command.
    • Linux command to perform the following:
      Sudo dpkg-I common ndiswrapper-
      须藤dpkg-I的的ndiswrapper-utils-1.9
      须藤dpkg-I ndisgtk
      Please be sure to pay attention to this order. If you get any error checking
      After using 'i' command, you may give your file a name
      Or download a different name servers do.
  5. Installing the driver in Ubuntu
    • Navigate to your system settings (upper right corner) and apply to wireless driver for Windows. This can also be through the application - Wireless Drivers> Windows -> System.
    • Enter your password, then use the menu to navigate to the driver that you store installed on Ubuntu. inf file (step 1).
  6. Verifying the Installation
    • Access to your terminal, enter again: sudo of lshw-C network. Ethernet interface, you should now see something like this: 
    • - Network
             Description: a wireless interface
    •      Physical ID: 1
    •        Logical name: WLAN0
  7. Configure your wireless network
    • Navigate to your network administrator by clicking one of the icons in the upper right corner. Here you can select the desired network configuration. You can use the same data AAS you use in Windows.
Hopefully this will end the pursuit of each person is WNDA3100v2 solutions Ubuntu adapter. 

(Tags: WNDA3100v2 not work / WNDA3100 work on the Ubuntu Linux / wireless adapter number WNDA3100 / wnda3100v2 / WNDA3100 / NETGEAR adapter WNDA3100 / NETGEAR adapter wnda3100v2 / NETGEAR wireless adapter / NETGEAR WNDA3100 drive / NETGEAR wnda3100v2 drive Linux operating system Ubuntu distribution / / WNDA3100 adapter)
Read More »

Thursday, 22 June 2017

Disable or enable input field using jQuery and JavaScript ~ GNIITHELP

JavaScript :
We can disable or enable an input box by setting property true or false respectively by using below code.
Code of input box
Name: <input type="text" id="myName">

To Disable input box.
document.getElementById("myName").disabled = true;

To Enable input box.
document.getElementById("myName").disabled = false;

jQuery :
If you are using jQuery 1.6+ then you should use the .prop() function to disable or enable input field.
$("input").prop('disabled', true);
$("input").prop('disabled', false);

Above code will disable all the input fields, if you want to disable or enable particular field, then you should use class or id of that particular input field.
Name: <input type="text" id="myName" class="myName"> 
$("#myName").prop('disabled', true);  // using id of input box
$(".myName").prop('disabled', false); // using class of input box

If you are using jQuery 1.5 or below then you should use the .attr() function.
To disable input field:
$("input").attr('disabled', 'disabled');

To enable input field: 
$("input").removeAttr('disabled');

There is also .removeProp like .removeAttr in jQuery 1.6 but we should not use it because once you use removeProp you can not again disable it.
Read More »

Windows 8 : Add or Remove Sleep or Hibernate in Power Options Menu of your PC ~ GNIITHELP

By following simple steps you can add Sleep or Hibernate to your  PC's Power Option Menu :

1. Open Control Panel > Power Options.
Or you can directly open Power Options by clicking on battery icon.

2. Now click on "Choose what the power buttons do" link given in left sidebar.

3. Then click on "Change settings that are currently unavailable" link given at the top and scroll down to bottom.

4. You'll notice that "Hibernate" or "Sleep" option is unchecked. Enable the option and apply the changes.

5. That's it. Now you can see missing hibernate or sleep option in power menu of Windows 8 as shown in following screenshot: 
    Read More »

    Pen drive is not showing files but it has data inside it. ~ GNIITHELP

    Problem : Pen drive has data but it is showing empty. 

    Solution : Sometimes data remain hidden so make sure files are not in hidden mode.

    To show hidden files 
    Computer --> Organize --> Folder and search options --> view --> Show hidden files, folders and drives

    Check your pen drive if still it is not displaying data then follow below steps :

    Step 1: Click on "Start" --> "Run" or "win+r"--> Type "cmd" and press Enter.

    Step 2:
    Enter this command. 

    attrib -h -r -s /s /d g:\*.* --> Press Enter (where "G" or "g" is your drive letter or you can replace "g" with your pen drive letter in this command) 

      
    You can copy the above command --> Right-click in the Command Prompt and paste it. 


    Step 3: Now you can check your pen drive data.
    Read More »

    How to Open the Control Panel in Windows 8 and 8.1 ~ GNIITHELP

    Below, I have given different ways to open control panel in Windows 8 and 8.1.

    1. Right click on Windows  and click on Control Panel.


    2.  On your desktop, open the Charms Bar, click on the Settings charm, click on Control Panel.
    Or you can directly open Settings charm by pressing Windows  + I keys. 


    3. Open Computer, In the Computer tab, click on Control Panel in the ribbon.

    4. Open Computer, click on the first arrow on the left side in the address bar, click on Control Panelin the menu. 
      Read More »

      Flush DNS cache - solved server not found Error ~ GNIITHELP

      If you know that your internet is working fine and still you are facing this error on visiting website's URL. Then below given solution can solve your problem.
      Problem : 
      Server not found
      Firefox can't find the server at www.blogger.com. 
      • Check the address for typing errors such as ww.example.com instead of www.example.com
      • If you are unable to load any pages, check your computer's network connection.
      • If your computer or network is protected by a firewall or proxy, make sure that Firefox is permitted to access the Web.
      Solution :
      Step 1: Open Command prompt : Press Window Key + R, type cmd then click on OKbutton.
      Step 2 : Type ipconfig /flushdns and press Enter. A message will appear statingWindows IP configuration Successfully flushed the DNS Resolver Cache.
      Step 3 : Type exit on command prompt to close command prompt.
        Read More »
