Showing posts with label Bootstrap. Show all posts

Wednesday, 2 August 2017

Broadcasting Chatserver Project java ~ gniithelp

Broadcasting Chatserver Project


Objective/ Vision

Users can interact to each other. They can share information to all others.

Software Requirement to run this project

  1. JRE

Hot to run this project

Run the server first, write: java MyServer
Now click on the executable jar file MyClient as many as you want. It will open different dialog boxes. Now try to communicate with each other.
click on the login button and enter your name, now you can share information.

Welcome Page
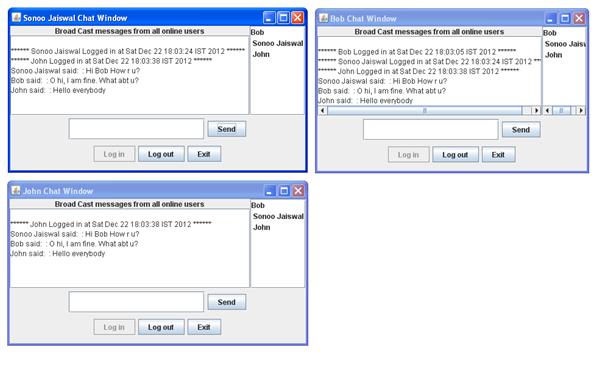

credit :- javatpoint
Read More »

Friday, 23 June 2017

Error in handling images and css folder with jsp page in eclipse ~ GNIITHELP

If you are creating a dynamic web project and you are not able to use css folder files and image files in your jsp page then you need to read below code.

Project folder structure

Linking css file internally from folder to jsp page 

Linking image to jsp page from images folder

Read More »

Enable USB Debugging Mode on Android ~ GNIITHELP

USB Debugging grants you a level of access to your device. This level of access is important when you need system-level clearance, such as when coding a new app.USB Debugging Mode is a mode that can be enabled in Android after connecting the device directly to a computer with a USB cable. The primary function of this mode is to facilitate a connection between an Android device and a computer with Android SDK (software development kit).

1. Android 2.0-2.3.x
Settings > Applications > Development > USB Debugging
2. Android 3.0- 4.1.x
Settings > Developer Options > USB Debugging
3. Android 4.2.x and higher.
  1. Go to "Settings".
  2. Scroll down to the bottom and tap "About phone" or "About tablet",
  3. Scroll down to the bottom of the "About phone" and locate the "Build Number" field.
  4. Tap the Build number field few times to enable Developer Options. Tap a few times and you'll see a countdown that reads "You are now 3 steps away from being a developer."
  5. When you are done, you'll see the message "You are now a developer!".
  6. Tap the Back button and you'll see the Developer options menu under System on your Settings screen.
  7. Go to Settings>Developer Options>USB Debugging. Tap the USB Debugging checkbox.
4. Android 5.0 Lollipop
  1. Settings > About Phone > Build number > Tap it few times to become developer
  2. Settings > Developer Options > USB Debugging
NOTE: To disable USB Debugging and other developer options when you don't need them, slide the switch at the top of the screen from On to Off.
Read More »

Error-JavaEE[Solved] : m2e Maven Dependency Plugin Install in Eclipse ~ GNIITHELP

Problem : Cannot complete the install because one or more required items could not be found.

Software being installed: m2e connector for the Maven Dependency Plugin 0.0.4.201410161303 (com.ianbrandt.tools.m2e.mdp.feature.feature.group 0.0.4.201410161303)

Missing requirement: m2e connector for Maven Dependency Plugin 0.0.4.201410161303 (com.ianbrandt.tools.m2e.mdp.core 0.0.4.201410161303) requires 'bundle org.eclipse.m2e.jdt 1.4.0' but it could not be found

 Cannot satisfy dependency:

 From: m2e connector for the Maven Dependency Plugin 0.0.4.201410161303 (com.ianbrandt.tools.m2e.mdp.feature.feature.group 0.0.4.201410161303)

 To: com.ianbrandt.tools.m2e.mdp.core [0.0.4.201410161303]


Solution : 
1. Start Eclipse IDE > Help > Install New Software
2. Paste site: http://download.eclipse.org/releases/indigo/  in Work with Textbox
3. Once the list loads, under "General Purpose Tools", check "m2e - Maven Integration for Eclipse ". 
Continue Installation with Next
Click Finish
Wait For Completion of Installation.

NOTE : Sometimes it still shows error while installation with Eclipse Indigo
so if you are not still able to install it then download "eclipse-jee-luna-SR2-win32-x86_64" 
It already comes with m2e Maven dependency plugin.

Please Comment Thanks to us if this topic is helpful :)
Read More »

IE8 CSS Hack ~ GNIITHELP

Using IE8 CSS Hack


You can use the ie8 css hack to force internet explorer to accept your @media queries. The ie8 css hack circumvents the inherent blockage/neglect by internet explorer. After finding the great solution to browser responsive CSS with @media queries you probably cried when finding out they don't work in IE9 and earlier.


This is normal use of: @media 
IE8 CSS Hack
IE8 CSS Hack
The above is discarded by IE9 and earlier. A way around this problem is by using the ie8 only css hack. 

To target IE 6 and 7

@media screen\9 {
    body { background: red; }
} 


To target IE 6, 7 and 8

@media \0screen\,screen\9 {
    body { background: green; }
} 

To target IE 8

@media \0screen {
    body { background: blue; }
} 

To target IE 8, 9 and 10

@media screen\0 {
    body { background: orange; }
} 

To target IE 9 and 10

@media screen and (min-width:0\0) {
    body { background: yellow; }
} 

Big thanks to Keith Clark for finding this ie8 css hack for @media queries.
It does not solve everybody's problem depending on your exact coding but using this css ie8 hack can help in some instances.
Read More »

Netgear wnda3100 driver does not work ~ GNIITHELP

After the fight with this netgear wnda3100 driver  myself, I decided to see the size that the internet contribute as I saw many people with the same problem and different solutions offered online that not everyone understand. 

The button with the installation is that you have to leave Windows the necessary files and then make them compatible with Linux, which is made by using ndiswrapper 

This is written for absolute Linux or Ubuntu beginners so far advanced, do not complain. 

Netgear

  1. How to use your .sys and .inf files (completed on Windows)
    • Since most Linux noobs like I come from Windows I assume you have the adapter installed on a Windows system. Navigate to your Applications directory (under Windows) and locate the NETGEAR folder. Look for the Windows 2000 or XP folder and copy all files there.
    • If you do not have access to a Windows systems to extract the driver files, there is a way to do this directly in Ubuntu using "wine". Since this requires more handling on the Ubuntu system, and since this is written for absolute beginners, I will not discuss that.
  2. Getting the ndiswrapper package files
    • These files can  be  found here. You need all three. 
  3. Put the files on your Ubuntu system
    • After you have the files you put them in a folder on you Ubuntu system. Note that the driver files must remain their permanently so chose a location that you will not remove later.
  4. Install the ndiswrapper packages
    • Open the terminal window. There are several ways to do this. The simplest is the key combination Ctrl + Alt + T. Further possibilities are available here . 
    • Navigate to your directory where you are, the ndiswrapper files with the "cd" command.
    • Run the following Linux commands:
      Sudo dpkg -i ndiswrapper-common
      Sudo dpkg -i ndiswrapper-utils-1.9
      Sudo dpkg -i ndisgtk
      Make sure you do it in this order. If you have any errors check the names after the '-i' command, since you may have your files have a different name or download server. 
  5. Installing the drivers on Ubuntu
    • Navigate to your System Settings (top right) and search for Windows Wireless Drivers. This can also be performed by applications -> System -> Windows Wireless Drivers.
    • Type your password, and then use the menu to select the. Inf file (step 1), which you saved to Ubuntu to the driver installation.
  6. Check the installation
    • Reach your terminal again and type: sudo lshw-c network. Next, to the Ethernet interface, you should now see something like this:
    • -network       
    •  Description: Wireless interface
    •        Physical id: 1
    •        Logical name: wlan0
  7. Your network configuration
    • Navigate to your Network Manager by clicking one of the icons in the upper right corner. Here you can now select the desired network and configure it. You can use the same data as in Windows.
Hope that these ends look for the Netgear WNDA3100 wireless adapter under Ubuntu.
Read More »

Thursday, 22 June 2017

How to show textbox value on message box with Jquery on button click ~ GNIITHELP

Here, we are working with textbox, button and pop up message box where we are showing textbox value in message box on same page on search button click using jquery.

index.jsp
put this script inside <head> tag 
put this code inside <body> tag

Output:


Read More »

Windows 8 : Add or Remove Sleep or Hibernate in Power Options Menu of your PC ~ GNIITHELP

By following simple steps you can add Sleep or Hibernate to your  PC's Power Option Menu :

1. Open Control Panel > Power Options.
Or you can directly open Power Options by clicking on battery icon.

2. Now click on "Choose what the power buttons do" link given in left sidebar.

3. Then click on "Change settings that are currently unavailable" link given at the top and scroll down to bottom.

4. You'll notice that "Hibernate" or "Sleep" option is unchecked. Enable the option and apply the changes.

5. That's it. Now you can see missing hibernate or sleep option in power menu of Windows 8 as shown in following screenshot: 
    Read More »

    Charge your smartphone while your laptop lid is closed/off ~ GNIITHELP

    Many-times I have to charge my mobile with my laptop but i can not down my laptop's lid because of phone charging goes off. But Now i can charge my mobile even by closing my laptop lid with a small change in Device Manager Setting.

    Important : This will only work  when your laptop is charging (Not using Laptop Battery)

    Device Manager >> Universal Serial Bus Controllers >> Generic USB Hub >> Properties


    Power Management :
    Uncheck "Allow this computer to turn off this device to save power"

    If This solution is not working then go to your Laptop BIOS to Enable "USB Wake Support".

    BIOS >> Advanced >> USB Wake Support

     Enable USB Wake Support and then exit with save. 

    Read More »

    Block or stop connecting Peers or IP Addresses to utorrent ~ GNIITHELP


    uTorrent is one of the more popular free torrent clients. The installer size is tiny and only a fraction of system resources are used when the program is running.

    µTorrent is Very Easy Way to Download Files. Its Very Convenient to Download through this Software. The Main & very Excellent Feature of this Software is that you don't have to worry about your Link Breakdown or wait to Shutdown your Computer till your Download is Completed. It works when it gets the Internet Connection and Starts its Work. It Resumes the Downloads from where it was Interrupted. 

    Steps to block connecting Peers or IP Addresses: 

    Step 1: Options > Preferences > Advanced or press (CTRL+ P) and set the value of ipfilter.enable totrue


    Step 2: Click the Peers tab. Right-click anywhere inside the Peers tab and uncheck “Resolve IPs”Tab. 

    Step 3: Open a Notepad window and manually type in any IP address per line that you wish to block, you can also block range of IPs eg. 192.168.2.xxx-192.168.2.xxx. Save the Notepad window (with the IP addresses) as “ipfilter.dat” (including the quotes). 

    Save/Paste this file on following location : 
    C:\Documents and Settings\<username>\Application Data\uTorrent (For Windows XP, 2003 and 2000). 

    C:\Users\<username>\AppData\Roaming\uTorrent (For Windows Vista, 7 and 8, 8.1). 

    Shortcut : Click Windows+R to open RUN an type %AppData%\uTorrent to open location. 

    Step 4: Right click anywhere on the Peers Tab and select Reload IP Filter:

    This will block all IP Addresses that are present in your ipfilter.dat file.
    Read More »

    How to Open the Control Panel in Windows 8 and 8.1 ~ GNIITHELP

    Below, I have given different ways to open control panel in Windows 8 and 8.1.

    1. Right click on Windows  and click on Control Panel.


    2.  On your desktop, open the Charms Bar, click on the Settings charm, click on Control Panel.
    Or you can directly open Settings charm by pressing Windows  + I keys. 


    3. Open Computer, In the Computer tab, click on Control Panel in the ribbon.

    4. Open Computer, click on the first arrow on the left side in the address bar, click on Control Panelin the menu. 
      Read More »
